Tags, Extras, Freebie Cluster Frames, Banners, Stamps, Blinkies, Glitter tags etc
Date, Time
My Fairies


Followers
Thursday, 31 May 2012
09:38 | Edit Post
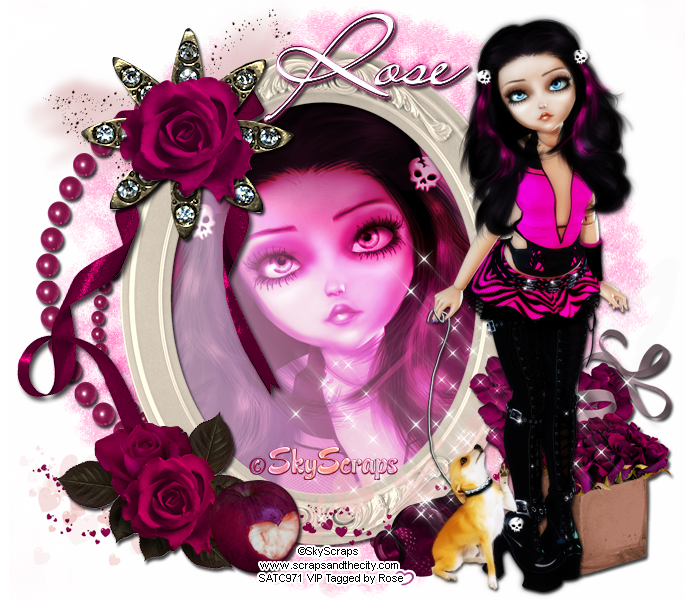
My Gothic Guardian PTU

Tutorial written on 31st May 2012
This tutorial assumes you have working knowledge of Adobe Photoshop CS2
♥ Supplies Needed ♥
♥ Tube of Choice I used PTU My Gothic guardian of SkyScraps can be Purchased at SATC
♥ Scrap Kit of Choice I Used PTU Golden Kiss by A Taggers Scrap can be Purchased at SATC
♥ Scrap Kit of Choice I Used PTU Golden Kiss by A Taggers Scrap can be Purchased at SATC
♥ You Need SATC License number to use this Art
Font of Choice I used LainiedaySH
Mask of choice I used 112 Insatiable Dreams mask
♥ Plugin Needed VanDerLee
Open new image (ctrl+n) size 700 x 600 pxl with white bg color
Open Frame11 and place it in center of your image now open tube layer9 and place it
on right side of the frame resize tube 58 x 58%
Open tube and place tube layer 7 on Oval frame and cut according your frame shape with lasso tool
Open Elements
Frame6 Behind Frame 11 little towards left side
Bow 1, Place it upper left side of the frame11 resize 80 x 80% and rotate -13.7
Flower3, Upper left side,
Flower2 Upper left side just on Flower 3 and resize it 50x 50%
Flower1 , place it on left side lower part of frame11 resize it 60x60%
Apple 2, Left side lower part of frame resize it 50x50%
Bottle 2 , right side lower part of frame behind tube 50x50%
Deco1, lover part of frame Center resize 70x70%
Flowers2, right side lower part of frame behind tube resize 60x60%
Heart4, place it behind and upper part of flowers2 layer resize 80x80%
Sparkles, resize it 60x60% and place it behind tube9 layer
Heartcloud2 place layer behind frame 11 resize it 70x70% and Rotate -18
Now Change color of all elements to match with tube to change color
Click Image> Adjustments > Hue/saturation (ctrl+U)
Hue -30
Saturation +87
Lightness +5
change settings and click ok
Select tube layer7 and again change color Image Adjustments > Hue/saturation (ctrl+U)
and click colorize and Hue 328, Saturation 58
make duplicate layer and select duplicate layer and click filter > VanDerLee > Light >
Color #fea9d9
xposition 30
y position 41
Angle 136
Focus 54
set values and click ok reduce opacity of layer to 60%
Add Drop shadow to all Elements
add mask layer behind all layers and add color overlay #ff018a
add mask layer behind all layers and add color overlay #ff018a
♥ Add copyright info and license number correctly
add text add effects stroke (color #6b013d) , drop shadow, color overlay (white)
outer glow (Color #f73595)
now delete your white bg layer and save your image as PNG
I hope you enjoyed this Tutorial 

Subscribe to:
Post Comments
(Atom)
Search
Categories
- Extras (136)
- Bibi's Collection (78)
- Tags (75)
- SPU (73)
- TPP (61)
- Tutorials (42)
- SATC (41)
- Animated (17)
- Fb Timeline cover (15)
- Cluster Frames (9)
- alfadesire (9)
- Blinkies (7)
- Banners (6)
- FTU Tutorials (3)
- Desktop Background (2)
- Greeting Cards (2)
- Stamps (2)
- Wallpaper (2)
- Word Art (1)
Archives
- January (3)
- December (3)
- November (4)
- October (9)
- September (11)
- August (8)
- July (8)
- June (10)
- March (11)
- February (6)
- January (4)
- December (8)
- November (12)
- October (7)
- September (20)
- August (8)
- July (10)
- June (13)
- May (20)
- April (11)
- March (14)
- February (8)
- January (9)
- December (12)
- November (8)
- October (6)
- August (1)
- July (5)
- June (3)


0 comments:
Post a Comment