Tags, Extras, Freebie Cluster Frames, Banners, Stamps, Blinkies, Glitter tags etc
Date, Time
My Fairies


Followers
Thursday, 9 August 2012
15:48 | Edit Post

Tutorial written on 10th August 2012
This tutorial assumes you have working knowledge of Adobe Photoshop CS2
♥ Supplies Needed ♥
♥ Tube of Choice I used PTU Sherry by Alexander McMillan at SATC
♥ Scrap Kit of Choice I Used PTU City Beach Bar by Inzpired Creationz at SATC
♥ You Need SATC License number to use this Art
♥ Font of Choice I used Portfolio
♥ Template of choice i used HERE
♥ Scrap Kit of Choice I Used PTU City Beach Bar by Inzpired Creationz at SATC
♥ You Need SATC License number to use this Art
♥ Font of Choice I used Portfolio
♥ Template of choice i used HERE
Mask of choice
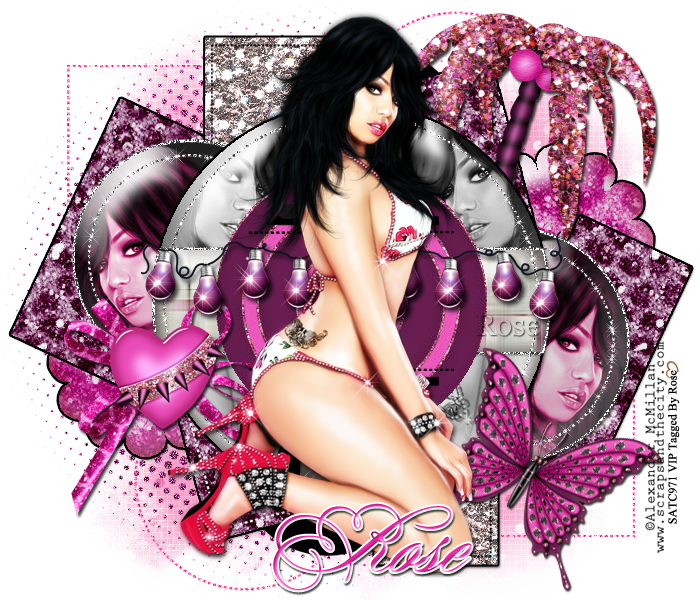
Open new image (ctrl+n) size 700 x 600 pxl with white bg color
Open Template and copy all layers and paste to your image resize it 80x80%
open tube file and paste tube on image resize it 70x70%
open new tube layer and paste it on dk grey circle 1 and 2
now add effects Click image > adjustments> hue/saturation >colorize > hue 340 saturation 50
and one tube layer on black circle make duplicate layer and flip horizontal and
paste it on other side of circle as shown in image
Add effects to layer Click image > adjustments> desaturate
Now open papers 5,8,9 and 10
paste paper 5 on Grey rectangle2
paper 8 on Dark grey squire 1 and 2 and black rectangle 1 and 2
paste paper 9 on grey flower 1 and 2
paper 10 on white circle
add black stroke to all your rectangles and squire
add silver glitter pattern on white doted frames
add pink glitter pattern to black doted squire and circle
Now open Element palm tree1 paste it on right side of template behind dk grey circle layers
Butterfly 1 resize 50x50% rotate 23.3 paste it on right side lover
part of template as shown in image
Open bow2 (resize 50x50%) and heart 1 (resize 30x30%)
paste them on left lower part of template
Open light blub string Resize 50x50% and make duplicate layer paste them on center
part of the template at upper part of grey rectangle 2
open halftone paste it on little left side of template behind all the layers of template
now add mask of your choice color #fd7fc6
♥ Add copyright info and license number correctly
Add text, font of your choice add effects stroke (color white) , drop shadow,
add color overlay color # fe2cb9
Now delete your white bg layer and save as PNG
I hope you enjoyed this Tutorial 

Subscribe to:
Post Comments
(Atom)
Search
Categories
- Extras (136)
- Bibi's Collection (78)
- Tags (75)
- SPU (73)
- TPP (61)
- Tutorials (42)
- SATC (41)
- Animated (17)
- Fb Timeline cover (15)
- Cluster Frames (9)
- alfadesire (9)
- Blinkies (7)
- Banners (6)
- FTU Tutorials (3)
- Desktop Background (2)
- Greeting Cards (2)
- Stamps (2)
- Wallpaper (2)
- Word Art (1)
Archives
- January (3)
- December (3)
- November (4)
- October (9)
- September (11)
- August (8)
- July (8)
- June (10)
- March (11)
- February (6)
- January (4)
- December (8)
- November (12)
- October (7)
- September (20)
- August (8)
- July (10)
- June (13)
- May (20)
- April (11)
- March (14)
- February (8)
- January (9)
- December (12)
- November (8)
- October (6)
- August (1)
- July (5)
- June (3)


0 comments:
Post a Comment